


 Drawing courtesy of Philippine Home Boatbuilders Yacht Club


LATEST NEWS on the new 17' build-it-yourself trimaran
LATEST POSTINGS ARE ON TOP — scroll down to see early modelling and start of buildGo to page 1, 2, 3, 4, 5, 6, 7
Posted July 19, 2010
Designer's Comment:
I've been asked several times by newcomers to sailing, 'Do you think I can build a boat? Perhaps one like the W17? … to which I might reply with three questions of my own:
Not wanting to fill up this page with my reply, those interested can read my reasoning by Clicking on this link First Time Builders.
Remember that if you then want to return back here, you simply click on PREVIOUS at the top of the new article page. Enjoy!
Posted July 16, 2010
More on the dagger board case. Here the centerweb is cut away after one case side has been added to retain alignment. Inside has already been sheathed with 6‑oz cloth.
Once the 2nd side is bonded in place, an inside fillet and sealing glass cloth can be added with help from a long dowel or a small brush with extension.


Below is a completed DB case (upside down of course). Note the small ledges added to support the floor beams that will be slotted through. Using cedar for framing, total weight of this unit with both sides sheathed came to a reasonable 3.7 kg.

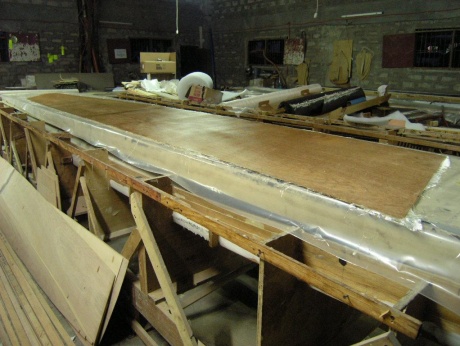
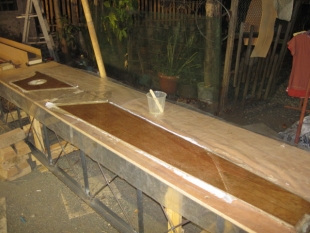
 Meanwhile, hull panels are created by scarfing together 8‑ft parts and once done, are pre-sheathed one side and stored until needed for assembly.
Finding a flat storage area this long is not always easy. Here an extension ladder was opened to 16 ft and a wood spacer added to make the top level. In this case, the ladder and panels were then slid under a building for total protection from the weather.
 Posted June 26, 2010
Here is the center web from another W17 under construction—this one in the US.
[Designer's note: This main hull web and all the bulkheads, can be cut exact-to-size from the plans, though I'd still recommend to allow 2–3 mm along the keel line of the web, for final fairing in place to match the hull sides.]
The daggerboard case spacers are being bonded and one temporary 1½" screw was added between the clamps to assure a light but even pressure. Once cured, one side of the pre-sheathed case ply will be added and then the center web cut away before adding the second side. This approach assures that the fore and aft parts of the web stay in perfect alignment.
For this boat, the builder has elected to use a sheathed 6.5mm ply for the bottom instead of 8mm. So, as called for in such a case by the plans, the forward end of the web has been revised to extend to the stem at 100 mm deep.
 Note the small size of this PowerSmith™ portable 4" saw. This 12 V lithium-ion battery unit is very light and works fine for cutting thin ply. Blade speed could be higher but if you proceed slowly, it makes a fine cut even across the grain and this reduces finishing time. Two batteries are a must though as one only gives about 30 ft of cut per charge.
Posted May 25, 2010
 Ply for the outer beam-ends needs to be moistened to fit the bend without undue stress, but once gently pre-curved, is thoroughly dried out before bonding.
 Here are the forward beam-ends, ready for exterior glass covering as per the W17 Build Manual.
The after ones are similar but smaller.
Posted May 20, 2010
Want to build a W17 but no protected space?
Well, why not a temporary shelter like this W17 builder has erected?
It's 18' × 7'3" inside (5.5 × 2.2 m) and made with inexpensive 'nominal' 1" × 3"strapping of Eastern Spruce (as sold in the US for 20¢/ft).
Material List
40 @ 10' lengths strapping plus 10 @ 12'
50' × 12' of polythene
1¼" fast-screws & some carpenters glue
Ten simple trusses with a covering of 6-mil polythene sheeting and diagonal braces for the side legs make a surprisingly rigid structure for a couple of days work and $150. Rollup end screens of the same material will be added. Side closure optional.


Guy ropes recommended to keep it grounded ;-) Dimensions available on request.


 Posted May 15, 2010
The W17 Build Manual has many useful tips other than detailed assembly instructions. One builder has completed a new scarfing tool based on a design given in the Manual. Using a router through a slotted-tray, this design permits scarfs on very wide panels and in this photo, is neatly machining four thicknesses of ply at the same time.
Although the W17 design does not need a tray so wide, this example was made for sheets up to about 900mm wide, in case so needed in the future.
Side wedges are best only screwed in place, so that wedges with a 12:1 taper can replace those of 8:1 as shown here, in order for the mast material to be scarfed here also.
Posted May 9, 2010
 Shown here upside down, the forward beam end is now closed. Note that it looks bigger than it really is and the aft beam end is also slightly smaller again.
The corners will later be rounded off and fibreglass added, all as defined in the W17 Build Manual.
 Meanwhile, another W17 builder has started on the main hull. First of all, he has created a scarfing jig (as shown in the Build Manual) and then used it for making very neat scarfs before joining the two ends of a main hull side panel—shown here after pre-sheathing. (He used to make scarfs by grinding out the surface and then joining with layers of glass tape. Now organized for wood-to-wood, he finds these scarfs are easier, lighter and perhaps even stronger).
Posted May 5, 2010
 Here the outer beam ends are being assembled. First the end blocking is prepared and fitted (photo 1) and then the lower corner molding is laminated from 2-3 thinner strips, clamped to the inner curve and which take shape while dampened with hot water towels.
 Once dry, they are bonded to the inner edge to provide more surface area for the closing plywood layers of 3mm ply. Although temporarily fitted on the outside (photo 2), they will be bonded to the inside once their ends are trimmed to fit. This is the most complex part of all the boat but still not difficult to do when taken step-by-step. As this builder reported 'tricky but fun'.
Posted April 21, 2010
Here are the undersides of the two central box beams. The center part 'A' is to spread the load over the gunwale edges (the added red lines) in way of the bolting (red dots).
This builder chose to increase the end-block scantlings (B) but then ended up somewhat overweight. The scantlings on the plans are more than adequate.

Here below are the two central beams being closed. Personally, I would like to see a batten laid along the top of the
 closing ply to spread the local load from the screw clamp D — see red line.
 The outer ends of the beams are curved in order to provide more water clearance.
So thick blocks are created at the ends by bonding 3 parts together and one bolt will then attach these to the amas (as well as general surface bonding).
Note that the inside surfaces already have a sheathing of biaxial 45/45 cloth.
Posted April 10, 2010
A center cross-beam takes shape. The blocks at the end will take the heavy lagscrews for the hinges - each to be set in reinforced epoxy. Here also is the center web of the main hull being glassed—the open space is where the dagger board case will go.

Posted April 7, 2010
Scarfing now underway and also the pre-sheathing of many parts. Here are the outboard beam-end webs being sheathed with biax 45/45 cloth.


Posted April 2, 2010
Ply parts are nearly all cut for the first boat and assembly will start shortly.

The Computer model now looks like this.

Posted Mar29, 2010
Two builders in the Philippines have made a start and their Build Platforms are complete. This sketch by the PHBYC shows some of the internal framing they'll be setting up shortly.

Posted March 24, 2010
Construction about to start on two W 17's in the Philippines. One builder computer-modelling while waiting for materials.

Posted March 20th, 2010
Plans now already in USA, France, Canada and the Philippines with interest from NZ, GB and Europe.
Posted March 8th, 2010
Building Plans and Manual for W17 made available today via website www.smalltrimarandesign.com
Go to page 1, 2, 3, 4, 5, 6, 7
"If you have any questions about the W17, please use our question & comments form." —webmaster
"See the Copyright Information & Legal Disclaimer page for copyright info and use of ANY part of this text or article"