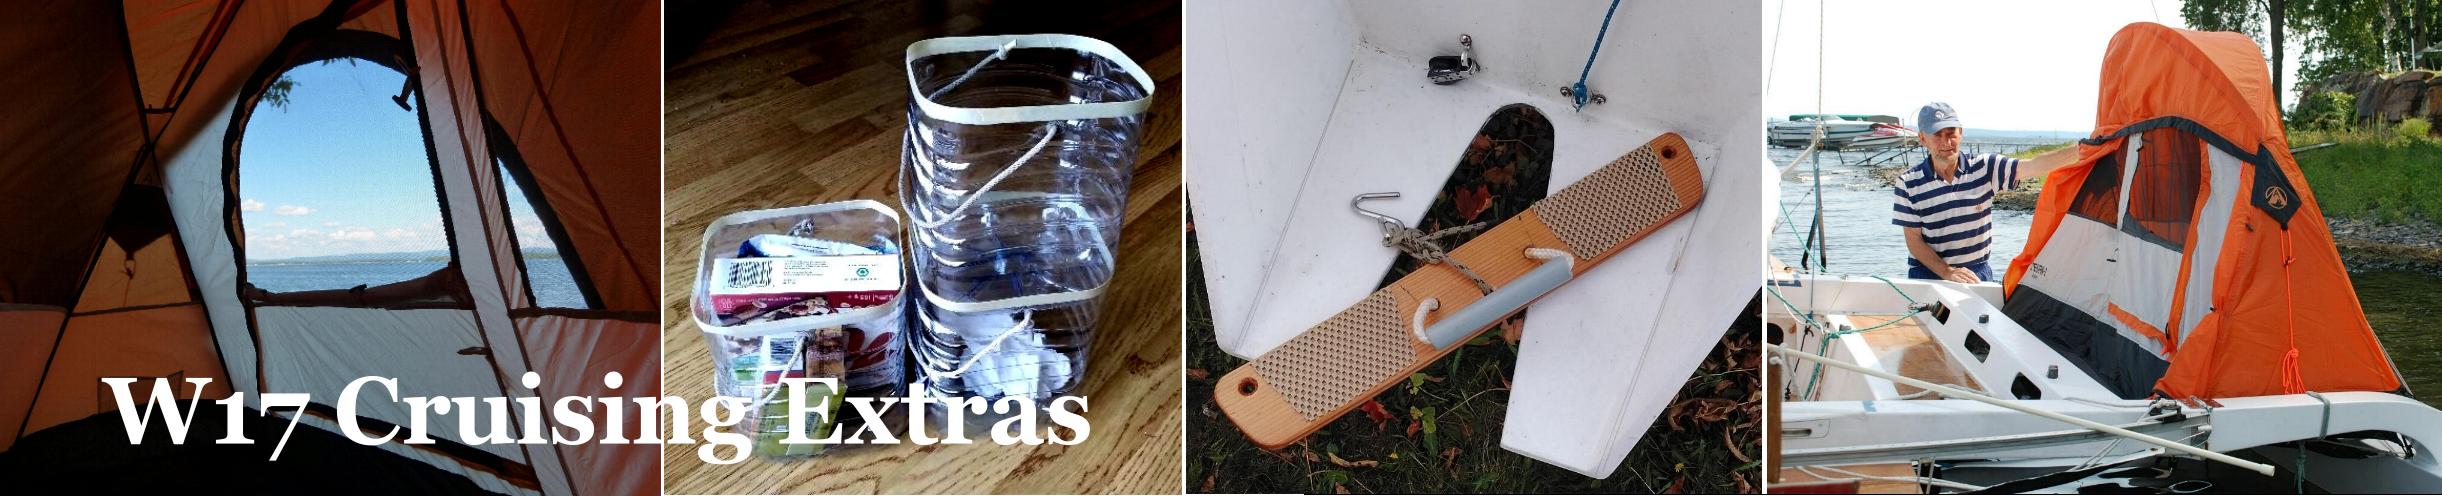


TENT Options for your small Trimaran .... with specifics for a W17
.
To overnight on a boat cruise there are typically two main options .. sleep on the boat or go ashore and pitch a tent. The latter means you can use an existing tent with good screening against bugs, but also limits where you can overnight as many quiet bays are surrounded either by a rocky shore or private property. You will also have to bring all your supplies ashore for any cooking etc., plus extra clothes in case the weather is different in the morning to when you set up camp. By comparison, setting up on the boat will take a little longer for the main tent (unless you can beach the boat first), as you have to work within the physical boundary of the boat afloat in the water and cannot 'just spread things out on the grass'. This can prove quite a challenge sometimes, but once set up, you will have everything pretty close at hand. Most camp-cruisers find ways to use both options, but for this article let's look at some 'on board' solutions.
For boats with a large cockpit, covering all of it with a tent canopy is one way to proceed, On a dinghy this is often done with flexible hoops or a metal or wood framework, either contrived to support the relatively large tent. Here, it's a question of extra protected space versus the stowage space for all the materials and set up time. Here is an example that invites us to consider the options. The positives are that its roomy with good headroom, plus there's a good chance it can be sealed against bugs. But it has considerable windage and there needs to be access to the foredeck for attending to the anchor. There is also minimal natural light.
Overall, this solution is still quite effective on a large mono dinghy like this, but we need to consider other options for a trimaran. On my W22 there is also a large cockpit. This results from my design preference of not compromising 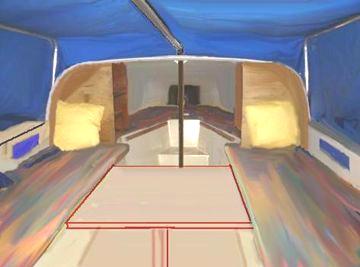 sailing performance on a small trimaran by covering half its length (or more) with a permanent cabin that will not only be vacant during the sailing, but severely compromises where the crew can sit for the best boat balance and performance. My personal thought on this is that any boat of 7m or less absolutely needs a cockpit that goes forward of amidships, in order to sail it efficiently. The end result is a small, relatively low-windage cuddy forward with a large open cockpit aft, a solution that allows excellent fore-and-aft trim to get the most from the boat's inherent performance. If this cockpit is then outfitted with a full but portable enclosure, one can have the best of both worlds as this large covered cockpit can serve as a living space with a pop-up dining table, with the cuddy used for a double berth with just sit-up headroom. (see pic at left)
But for the smaller W17 and similar tris, there are broadly 3 options. All can be available at fairly low cost ... unless you choose to have a custom tent built for you.
OPTION 1 is the use of individual 'pup' tents that are set up on a trampoline each side. Advantages are the quickness for 'set up & take down'; individual privacy that each provides; lightest weight and easy storage. Comfort on the standard W17 tramps is also assured as the poly-mesh tramps both drain and ventilate, yet are still firm without being hard. Such solo tents are also relatively low windage from the front and as they only open on one side, can be oriented to readily enter the cockpit as needed. Finally, being self-contained with screens and zippers, they are automatically resistant and sealed against mosquitoes and bugs .. an important aspect in some areas where mosquitoes or black flies can destroy your peace in a couple of hours..
The CONS are less, but 1) they separate couples who may need to share warmth; 2) if its raining in the morning, one needs to dress inside the small tent without standing up; and 3) only a snack will be possible until things dry up enough to prepare meals outside. But you can still chat across the cockpit so its not a bad solution unless poor weather is upon you for several hours.
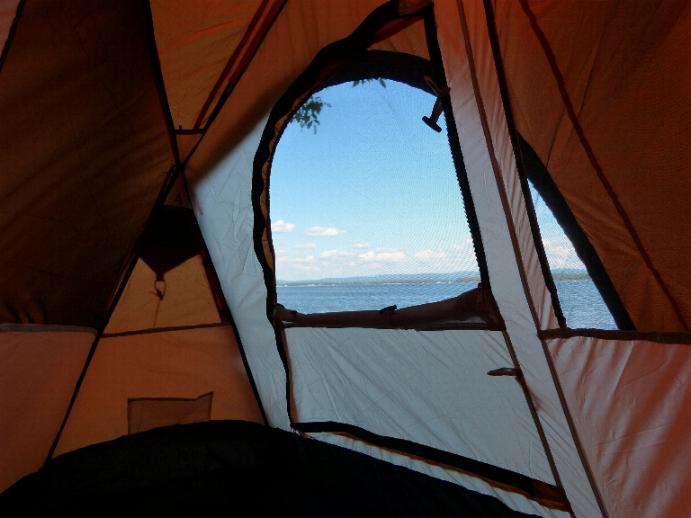
Here is what such a tent looks like. This one was bought for just US$60 (2021) so it's not a heavy rugged affair, but its polyester material is still strong enough for a few seasons of regular use if treated with care. The tent is about 7ft x 3ft with sitting headroom in the center. It comes with a small flysheet over the top, allowing some ventilation under it. It's a lovely morning sight to drop a screen while still in your sleeping bag and enjoy the view while your crew still dreams (or snores) some 10ft away. The base should be tied to the tramp and a couple of guy lines added to the bow of the two hulls to keep things in place in a strong head wind. Adding a flag to your topping lift or dropping a short flagstaff into sockets on the aft beam, can also help to keep a boat from 'sailing around' too much. Store the daggerboard in the cockpit as leaving it down generally makes things worse.
The main limitation as mentioned, is that if its raining in the morning, the whole cockpit is wet and even getting to basic food supplies may require dressing inside the small tent. Only a tent over the whole cockpit can address that issue and for this there are two main choices.
OPTION 2: The easiest to set up is probably a boom tent. Monohull dinghies often create 'quite the house' with lots of wood beams, supports and metres of canvas. But this takes space and on a multihull, we just do not have ANY spare displacement if we still want to retain our extra performance,
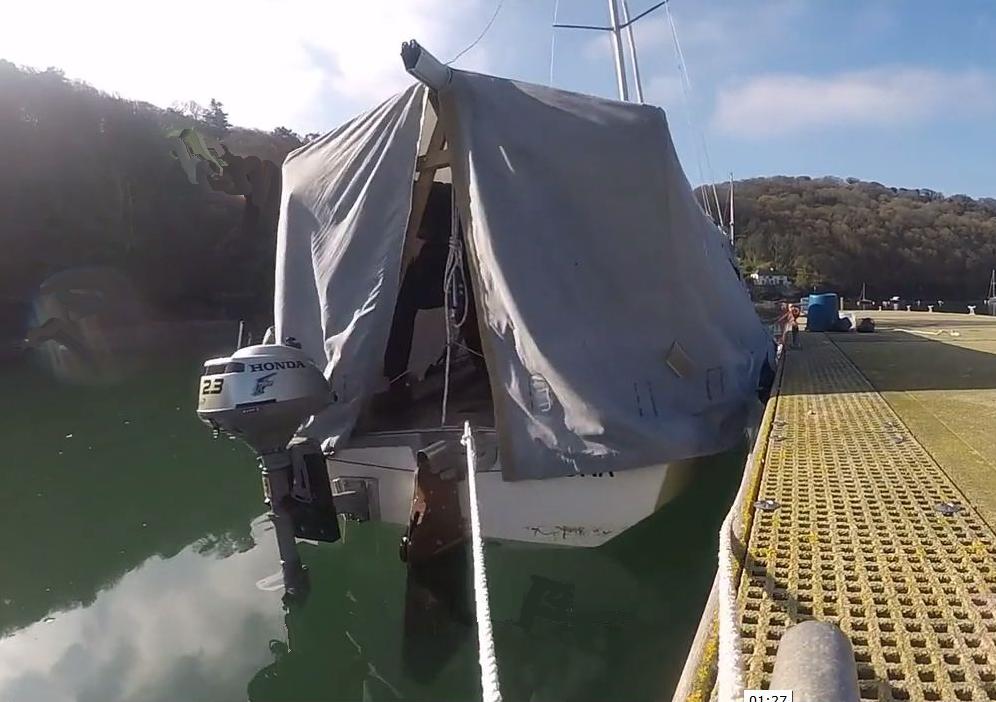
so I prefer something lighter. Either way we require a boom crutch at the after end .. which can be a simple, lightweight scissor crutch (80 x 10 pine) that will store handily and out-of-the-way behind the main beam of a W17 by a shockcord or rubber strap. Once the boom (with rolled mainsail) is dropped in place, it typically needs no further attachment if the boom is fixed to the mast at the forward end*. The boom should be lower at the forward end, so that the wind will flow easier past the canopy, moving the center of pressure aft, further stabilizing the boat at anchor. (*A rotating wingmast should be lashed on the centerline).
While those planning some major adventure in all types of weather may want to enlist the help of a professional tent maker, not everyone needs to make this sort of investment for the occasional overnight or even for a summer week on board. So lets look at these inexpensive DIY solutions.
A boom cover can be made from various materials to suit your budget, but an inexpensive, lightly re-enforced plastic cover sold as a Utility Tarp will serve for several seasons if handled gently. Such tents will almost always need to be custom (home) made though, so here is how I approach this. Be aware that while darker covers are typically more UV resistant, paler ones will let in more light. Being as the tent is generally only up at night, UV should not be an issue if its stored-away out of the light. One can also elect to sew and bond in a white transverse strip for a compromise between light and privacy.
First, purchase a standard cover that is at least 3ft (1m) longer than your boom length and has enough width to entirely cover your cockpit when pitched up over the boom … but then add 3ft (1m) to that width. Alternatively you can just buy a cover without the 3ft extra noted above, but then buy a smaller cover to give you the extra material you will need. Using contact cement is fine to join extensions on, but also add a stitched seam as well for long term security. (Try to keep all contact cement seams out of the rain. Spraying or wiping over stitches with silicone will add to its life and water-repellence
The extra material is to close in the ends, PLUS to have two full length strips of about 18” width that will be bonded inside the cover to provide skirts to close the tent to the cockpit sides to keep most of the bugs out. A rough design is shown below. With the plastic tarp material, a good quality contact cement (preferably rated for exterior use) works well to bond on these insect proof skirts, as the joint is inside and not directly in either sun or rain. (A 50mm wide overlap is recommended for bonding). The flap around the front will typically be designed and cut to go around the mast with a good overlap. While this overlap can be closed with eyelets and lashings, I find that just folding the ends together with a double fold and adding some strong plastic external clips can work well also. Such clips are typically available as general household items .. just choose ones with strong springs and minimum windage in order to stay in place.
The following sketch will show the general idea but each boat design will require its own design. (Note that the W dimension will be narrower at the mast end than at the rear, if the boom is set lower at the forward end as suggested earlier).
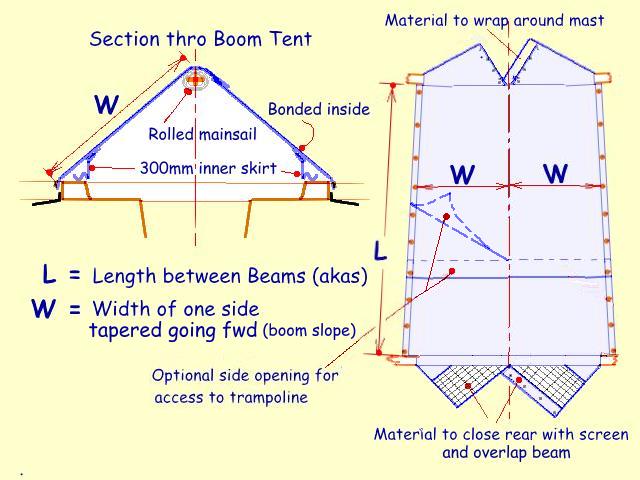
The 'inner skirts' are just contact glued on inside (away from rain) and additionally have a row of stitching. This allows you something to close with the cockpit seat to cut influx of bugs. Just folded down on the top ledge will generally be enough but in a really bad bug location, this skirt can be duct-taped to the seat back for full enclosure. Trust me, when you need it, using a partial roll of tape will more than make up for a tough evening when the bugs are biting ;)
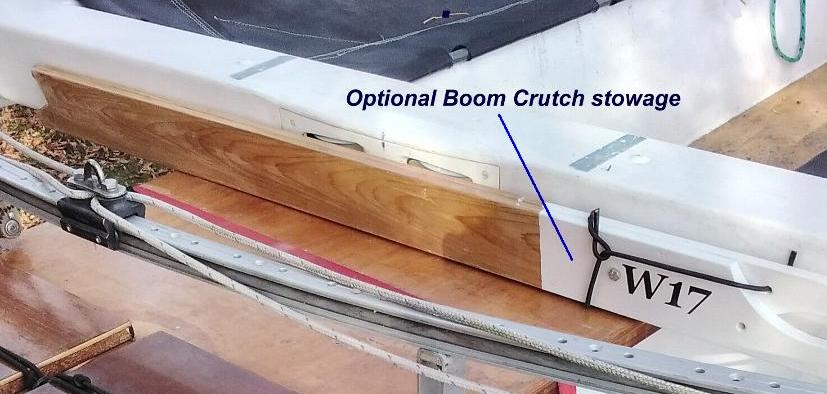 The boom crutch can be folded and stowed behind the main beam and not interfere with anything else. See here --- >
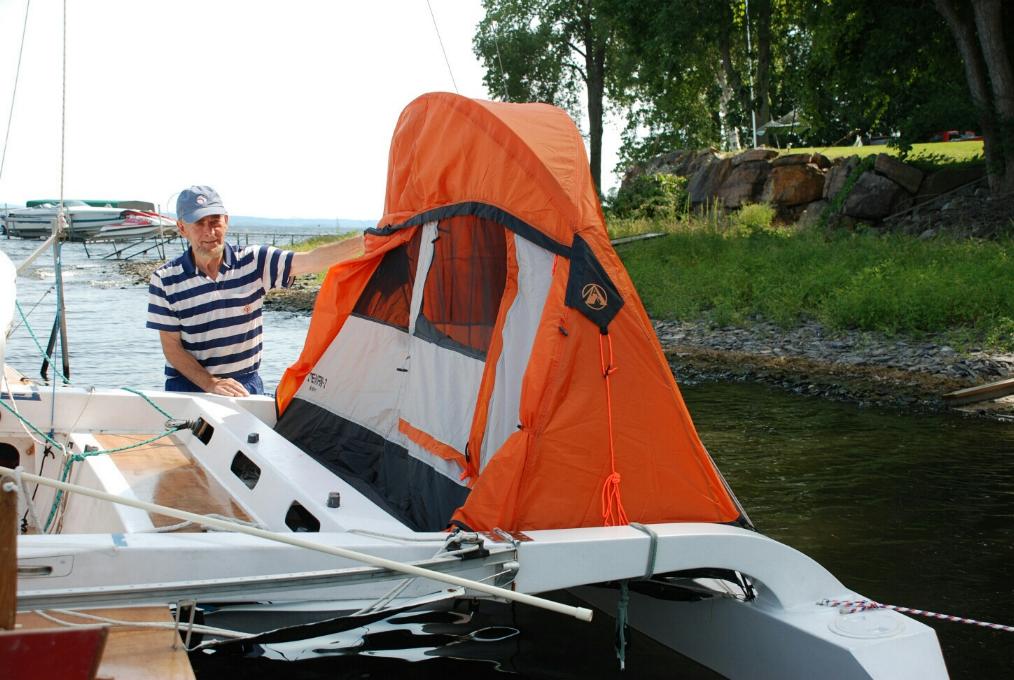
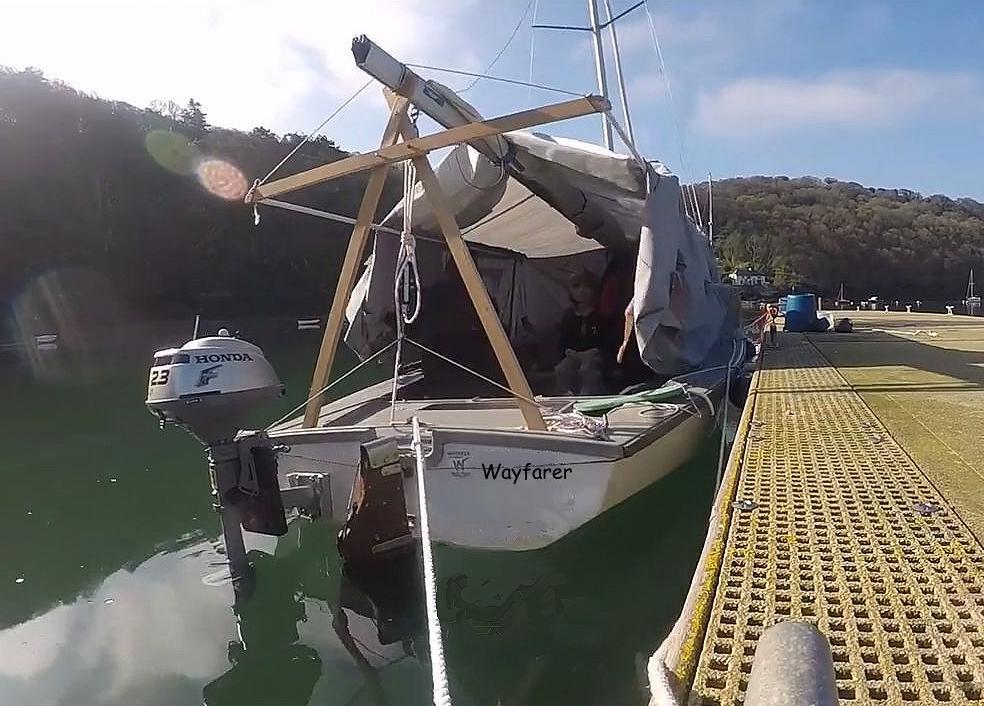
OPTION 3: The third solution to enclose the cockpit is to use an existing Dome Tent, but first make the changes as needed to make it fit. Let's look at doing that for the W17, but first the boom and sail would need to be removed, laid on the tramp away from the tent door and lashed in place, at least at its forward end.
Buy a dome tent that closely matches the exterior dimension of the cockpit .. (better too large than too small, as one can always take pleats to make it fit). The closest for the W17, will be 7ft x 8ft. One issue with a dome tent for a boat, is that the diagonal fiberglass rods are VERY long (like 15ft when assembled!) and when afloat, there is just not the exterior space on a boat around the outside to set up the tent as designed, so some mods are needed. After much experimentation, I chose to divide each of the two main ‘hoops’ into 3 lengths ... after cutting the small interior elastic. (The small lengths of fiberglass rod are best just taped (or even bonded) together before you lose one overboard). Finally you will have one length of about 7ft over the center (which can be installed while standing in the cockpit) and two end rods of about 4ft. ‘Normally’ the rod ends are hooked into a ring at the corner of the tent floor, but when using a dome over the cockpit, most of the floor will be cut out, so these end rods need to be anchored into fixed tube sockets, epoxied to the boat (see below).

I used 1/2” dia PVC tubing with a thin ply spacer-web at the rear of the aft beam (see photo at right) , held in place with a couple of layers of fiberglass, permanently bonded to the aft beam (after g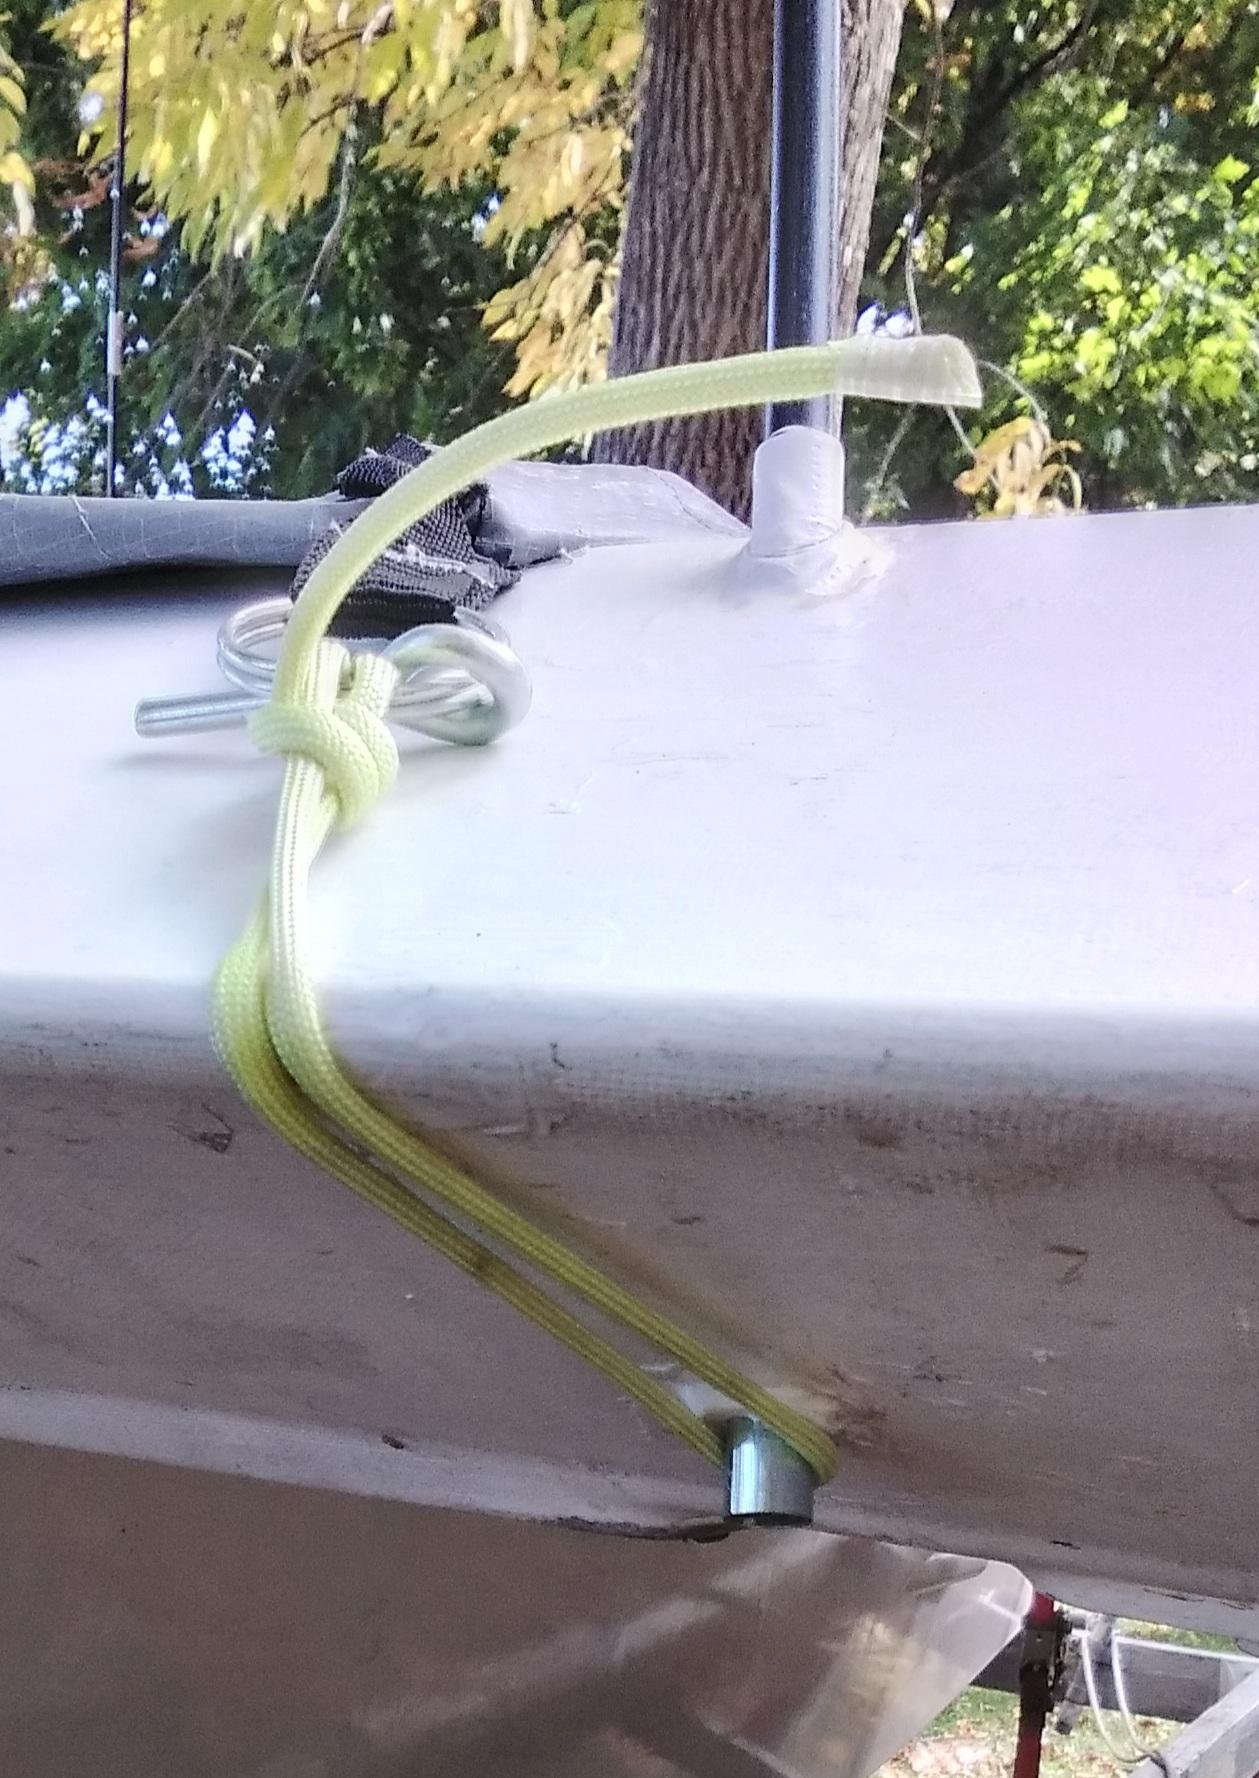 ood
ood  surface prep of course). At the forward end, I used a short length of 1/2” fiberglass tube slipped down through the forward beam fairing (see photo at left). In both cases, these socket tubes are aligned toward the center of the cockpit so that the hoops can drop into them with fair alignment and without much stress. Drilling a small hole in the ply brackets will hold the after tent strap pins, while wrapping a small rope under the extended tube under the beam fairing, will generally hold the tent to it up forward (see pic at left).
To prepare the tent, place the tent floor uppermost and mark out a rectangle about one foot (300mm) smaller all around than the full floor and (bravely) cut this out (see sketch below). With what is left of the floor, fold in a pocket and sew it around so that a long shockcord can be fitted later to add a little tension to this 'floor' around the cockpit. This will then form a lightweight shelf to hold clothing, flashlights, toiletries etc.
The exterior of the tent will also need a few attachment straps to hold the lower edge down to the cockpit coaming (side boxes & beams) all around, spaced about 2ft (600) apart. Sew on a D-ring with a strap and hook this to a small nylon eye on the coaming.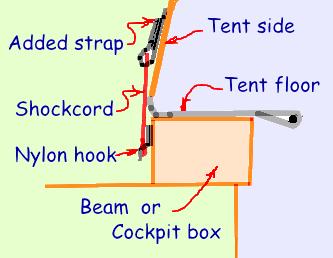
As the main entra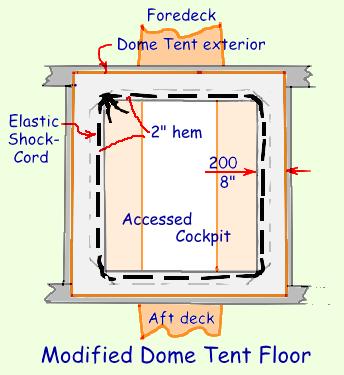 nce is on one side only, it will open on to one trampoline. To have access to the aft deck, (for supplies and to reach the other trampoline) an extra opening will be needed below the aft window, so expect to do a few small modifications to the tent shell. You may even decide to add another zipper to access the other trampoline directly.
For assembly, its important to remember that if the boat is 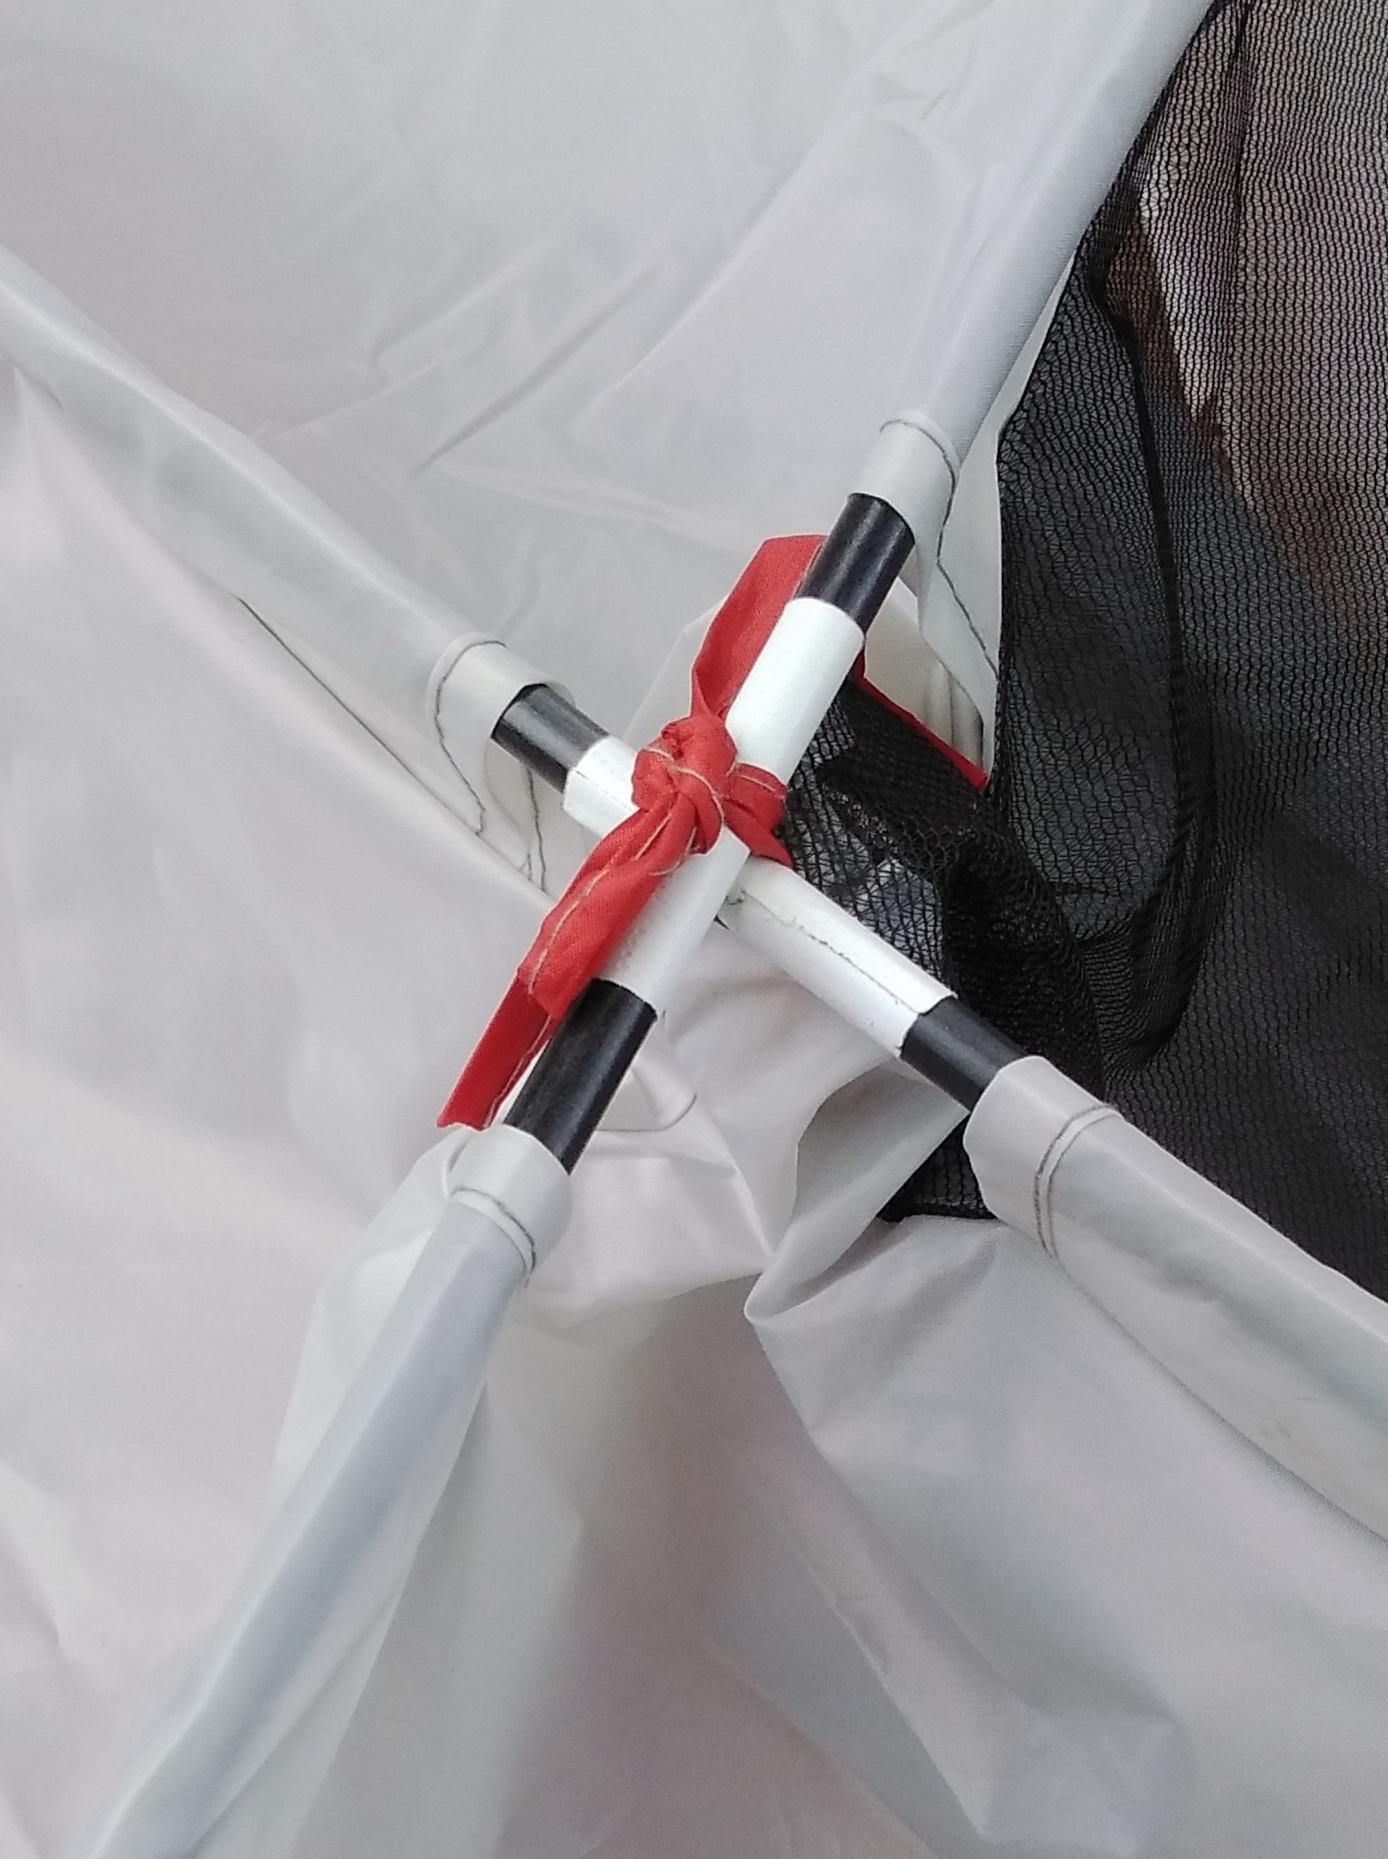 afloat, you will only have access to the outside from the trampolines and decks. So the tent is loosely spread over the cockpit and the 7ft fiberglass-pole sections are thread through the tent loops that will hold it up. Where they cross at the center of the tent, they should be lashed with a short length of elastic cord. See pic. at right.
Now place the 4 shorter FG rods into the corner tubes. If the tubes are correctly installed, the rods will incline slightly towards the cockpit center. Now raise the center part and flexing the 7ft FG tubes, slip the ends into the 4ft poles as you push up the center of the dome. It may seem awkward the first couple of times, but you soon learn ;) 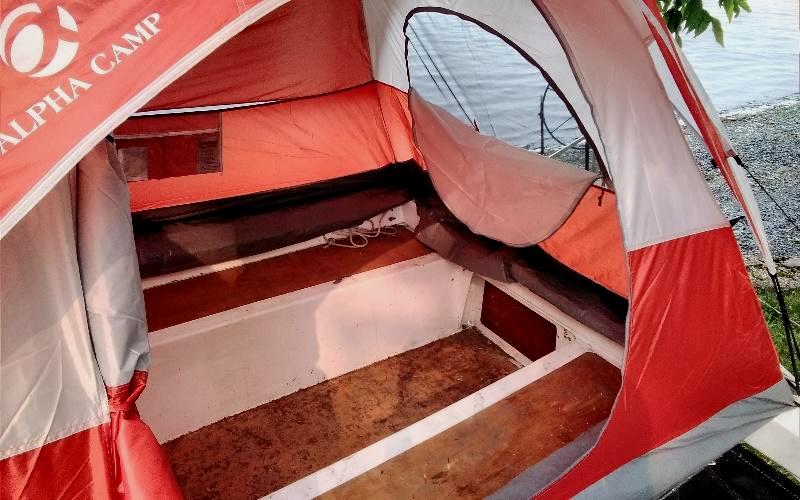
Once up, you can throw over the fly sheet and attach the tent guys to the hull decks fore and aft. The great advantage of such a tent is that with the floor opened up, you now have standing headroom inside a W17 (if you are of average height). and can now use all of the cockpit even in poor weather.
With the cockpit so covered, one can now either sleep in the narrow solo tent on the port ama where access to the Dome is possible, OR organize to sleep inside the cockpit itself. If alone, sleeping on the cockpit floor is the best, with either a foam mat or inflatable mattress. If you want or need to set up a double, then the cockpit seats can be bridged with a roll up support like this.

While most of the weight should still be placed on the seats, this 'bridge' gives adequate edge support, though not designed for extra-high loading. Suggest to leave the after 2ft open as a place to still stand, even with a double bed set up.
If others have found equally effective solutions, please feel invited to share and I will pass on all ideas with merit. Enjoy, and I always welcome photos of your set up, especially when in use with friends or family enjoying your personal adventure.
mike ... March 2024.
.
.
"New articles, comments and references will be added periodically as new questions are answered and other info comes in relative to this subject, so you're invited to revisit and participate." —webmaster
"See the Copyright Information & Legal Disclaimer page for copyright info and use of ANY part of this text or article"