


Intro Part 2—Building the W17 Trimaran
For additional descriptive information on the W17, CLICK on one of the links below.Preliminary Design Concept & Development
Review of W17 Hull Forms
Intro Part 1—The W17 Design
Intro Part 3—Build Manual & Plans
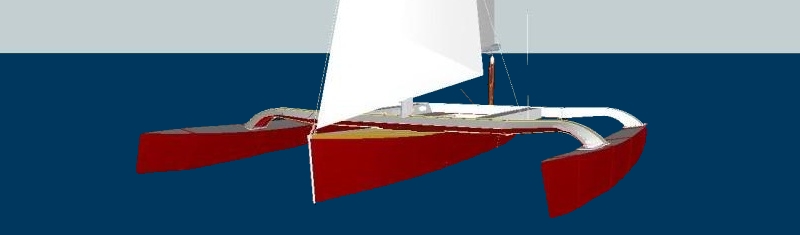
W17 Study Profile
Order Plans
Although the actual Build Manual breaks the work down into some 75 tasks that are explained in far more detail, this summary will give the reader an idea of the general build process.
The first job is to create a building platform (see plan) as this will be very useful for cutting and assembling many of the boat parts. Its height will depend on how tall you are, as you want it high enough to not have to bend too much while working on the 3 hulls, yet low enough to use as a saw table for parts. So the plans give 21-24".
First work will be to use the platform for the construction of parts like bulkheads, stem-piece, central main hull web, and dagger-board case. Another plus with the W17 plans is that they include detailed nesting sheets to show how the plywood is to be laid out and cut—a great material and time saver. But, more on that in the next article.
 Once the parts are marked out as per these guidance sheets, some will need to be scarfed together. This simple process is explained in detail in the Build Manual. While the platform is free, it's also the best time to do the pre-sheathing of all the interior surfaces of hull skin. For the bulkheads, there is no tedious work of adding slotted side-stiffeners or framing, as the bulkheads will later be taped in place from the inside. It is also suggested to build the akas (crossbeams) at this time while the building platform surface is still available. While the central parts are straight boxes, the outer curved sections will need more time and also some added glass or carbon fiber as called up by the plans. Full info on how to do this is given in the Manual, along with many other details.
Then it's on with the assembly of the main hull (vaka) and smaller side hulls (amas).
Once the parts are marked out as per these guidance sheets, some will need to be scarfed together. This simple process is explained in detail in the Build Manual. While the platform is free, it's also the best time to do the pre-sheathing of all the interior surfaces of hull skin. For the bulkheads, there is no tedious work of adding slotted side-stiffeners or framing, as the bulkheads will later be taped in place from the inside. It is also suggested to build the akas (crossbeams) at this time while the building platform surface is still available. While the central parts are straight boxes, the outer curved sections will need more time and also some added glass or carbon fiber as called up by the plans. Full info on how to do this is given in the Manual, along with many other details.
Then it's on with the assembly of the main hull (vaka) and smaller side hulls (amas).
The main hull is set up on the platform upside down as per the above sketch, but also with the central web and dagger-board case assembly slotted into the bulkheads at the ends of the cockpit and for the temporary Station 5. The transom, peak bulkhead and stem-piece are then also set up at the right height and the single side stringer then installed. By lining up the stringer with the top of the already installed case, minimal work will later be required to fit the cockpit floor.
Perhaps the best way to demo how the Build Manual will guide the builder through each step, is to look at a small excerpt from a section of the manual right here. Keep in mind that there are also plans and sketches to further clarify actions explained. So here are a couple of paragraphs.
"…The main hull is then easy to complete as its flat bottom is laid over two easily curved ply sides, that are in turn wrapped over the framing already set up on the Building Frame.
SIDES
After pre-fitting, the pre-sheathed ply must be lightly sanded where it will contact any new wood part and then simply laid over the frames with just a bead of thickened epoxy. While practically any appropriately thickened epoxy can work for this (see earlier note on this), using the new West System® Six10™ expelled from a cartridge is probably the most painless way to do this. It will certainly permit easier control of the small bead size required and save mixing time.
A 40mm notched spreader (see tool section) is used to spread epoxy over the larger stringer surface.The ply sides can then be lightly clamped in place with small (1") spring clamps at the gunwale and simply taped together at the bow over the stem piece. To get adequate contact to the stringer, be prepared to staple the ply along its length, using a strip of strong tape or plastic under the staples in order to get them out easily once the joint is cured. I'll often use a narrow crown stapler for this over some old telephone wire, but even the wider stapler can work if you hold it at say 40° to the vertical. Keep the staples as short as possible but the required length will vary with your specific stapler and wood, so experiment a bit. A short piece of dowel is handy for measuring how far down the stringer is at that point (see photo).
WARNING!! Remember that the frame at Station 5 is temporary so NO epoxy should be put on that frame at all!
BOTTOM
Once the sides are cured, the bottom should be fitted to the sides and laid on in much the same way. First cut an undersized slot for the dagger board before fitting, so that one can see that the joint with the dagger board case is well made and correctly finished inside before the epoxy cures (see plans and additional note on how this should be done). Using just duct tape or a couple of layers of masking tape will be enough to hold the joint with the sides closed while curing, as avoiding to use the stapler at ply edges will prevent splitting. If the edges were correctly prepared, fair and flush with the bulkheads, they will fit well together.Once thoroughly cured, prepare to turn the hull gently over. First release the frames and stem-piece from the Building Frame. But before turning the hull over, cut a couple of pieces of scrap plywood or medium-density fiberboard (MDF) to fit loosely over the bottom at say Stations 2 and 8. Once you've attached a couple of fore and aft brackets to these two rough frames, you'll have something to mount on the floor to sit the hull into, while you work on the inside."
So that's easy enough, no?
Once over, you'll first add the exterior gunwales. Then apply thickened epoxy (or again the Six10™) to each inside corner at every bulkhead and smooth this fillet out with the rounded end of a large Popsicle® stick or equal.  Once cured, lay in glass tape as further defined and detailed in the manual. The bottom is then finished with two more coats of epoxy before fitting the cockpit floor. The deck beams are next, along with the small partial bulkheads that will support the cross arms and forestay. Add the blocking to take the cross arm bolts and after checking that all the internal blocking and doubling is in place for attaching fittings etc, fit the deck panels and stiffening brackets and ply doubling at the stern. The cockpit seat ply is then fitted to the top of the gunwale and finally, the central parts of the cross arms are bonded and bolted in place.
The two amas are also built on the platform and as they have no center web or case, are even easier than the main hull. Once their decks are on, the outboard crossbeams are aligned and fitted in place. The hinges are also fitted at this time but with removable pins, it will be easy to separate the parts for space and temporary storage of parts not always needed.
Then it only remains to sheath the exterior and full details and references are given for that. The remaining loose parts are the rudder and dagger board, and the various fittings for the rig to prepare for, prior to the final finishing with epoxy and then, either varnish or paint.
As for most boats, extra time needs to be planned for details like the brackets for the mainsheet track, jib sheet leads and the rudder hinge etc.
But overall, this is a project that's possible to complete in one season, not some huge project of many years where interest may ebb and flow.
So in a few words that's globally about it…
Click here for Intro Part 3—Build Manual and W17 Plans
Click here for the Study Profile
"If you have any questions about the W17, please use our question & comments form." —webmaster
"See the Copyright Information & Legal Disclaimer page for copyright info and use of ANY part of this text or article"