


Making a Dagger Board
Although this description is specific for the W17, the concept can be used for almost any dagger or centerboard.
For the W17 dagger board length as designed, first select 3–4 pieces about 1300 mm long. (If you wish to make a slightly longer dagger board, you might need 1.40 m—see plans).
Here I used 100 × 25 mm nominal mahogany, which comes pre-planed at 90 × 19 mm thick, so you still need 3 pieces plus a small strip to give you 285 total wood width (290 with glass). Keep in mind, that you are aiming at a final weight of board, with all glass and CF reinforcement, that will just float.
[Being much lighter can mean a shock cord strap will be needed to keep it from floating up.]
 Pass a sharp plane down the edges to make sure all is straight and square.
In order to be sure enough glue is left in the joints, I generally make some light diagonal surface saw cuts on adjacent pieces and then, when they are laid flat, these cuts form a cross and help to link the two parts through the epoxy.


Although quarter-sawn timber is preferable when available, narrow slab-sawn planks can be bonded as per this sketch to keep potential deformation to a minimum.
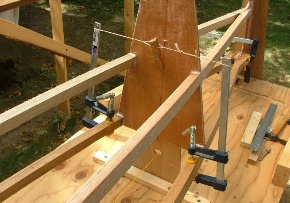
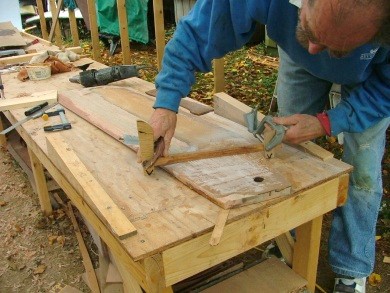
Lay the boards on 2‑3 long clamps and mark out the outline, so that you'll know how to align the pieces correctly when bonding. Check for twist or warp.
If you do not have enough 300 mm (12") clamps to tie the boards together, it's easy to make them with a strong back, blocks and wedges—see central clamp on photo below. Place a strip of wax paper over this strong back to keep it from bonding to the board.
Spread on a thin film of thickened epoxy with a notched spreader, making sure it fills the saw cuts. Then lay the boards in position and before finally tightening the clamps, use a straight edge across the surface and push up any plank that is below level so that finally, they are all flush with each other.

Only tighten enough to have a small bead of glue squeeze out of the joint. Tap wedges gently also if you're using homemade clamps.
 Once all is in place, use a spreader stick that has been sharpened like a chisel, to scrape off excess glue before it hardens—at least from the topside.
(The underside is less of an issue as it tends to drip away from the wood).
Before leaving the assembled boards to cure, check again that there's no twist being built in. Place a spirit level across one end (place equal thickness spacers


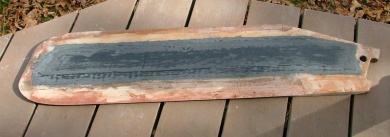
Once almost cured, scrape off the excess resin and leave to harden overnight. Meanwhile, you can plan the shaping.
Working from the section of the finished board (as shown for the W17 on Plan 08), draw parallel lines equal side of center, to represent the thickness of the wood core you have. In my case, it was 19, so in order to reach the final thickness of 27, I need a total of 4 mm to be added each side.
Well, two layers of CF and two layers of cloth will not be far off 2 mm, so I need just another 2 mm of fill. By drawing the 2 mm of FG 'skin' in from the outer profile, I can determine exactly where that fill should go and it will look somewhat like this.
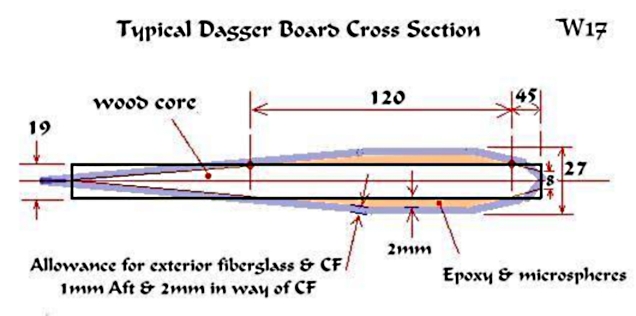
So now we know where to add some filler—120 mm wide and 2 mm thick, tapering to zero. So mark this area on both sides of the board. These lines will also give you the place to start tapering the wood core, down to say 1 mm wide or less at the rear edge and to 8 mm at the leading edge. Make sure the board is well marked all around with what will be the centerline of the board. This will keep you from creating twist during the shaping process.
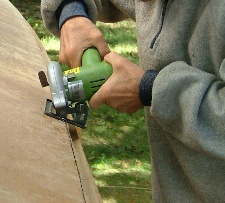
 Core shaping used to be a long miserable job by hand and I've done many that way. But a power plane can make this almost as easy as doing a haircut with clippers!
[If you don't own one, I suggest to borrow or rent one—it's worth it for this job alone, though don't use it for everything—it will split any ply it crosses into shreds!] And for safety, just be aware of where that fast turning blade is—roughly vertically under your thumb on most machines. Although you can start with some fairly coarse cuts, remember to adjust the front nose plate for finer cuts as you get closer to the shape you need. Do the last shaping by hand though, with a plane and spokeshave. (Go to this article if this is a new tool for you: First-time Builder.)

You'll need a female guide template, the shape of which you can get from the plans. Make it two sided. One profile to match the finished exterior but the other to be from 1 to 2 mm less width, to directly match just the wood and filler, before adding the carbon fiber and sheathing cloths. It will look like this — except that it pays to keep both forward ends square and not internally rounded as the top profile shows. This is because the front edge of the board will still be square when this used.
Then mix and add filler, using a flexible plastic spreader to get the approximate profile. Using sandable filler material, you can afford to put a little more than you finally need, in order to keep the surface fair as a base for the carbon fiber to come next. Naturally, wait until one side is cured before doing the other. Then grind and sand your board until it looks like the required finished product, except that it will be a total of 3‑4 mm under-width at the thick part and 2 mm under, in way of the bare wood at the rear. (Only pre-round the front nose once the section is about perfect, as the square edge serves as a good guide for the profile template.)
When you're satisfied, check it all over again and make sure all the dimensions are correct—and for good measure, sand it again. It's pretty easy to still patch and fix right now, but once the carbon and glass go on, you're far more limited. Then give the whole surface a prime coat of epoxy. Lightly sand again.
If by chance, you notice that despite all your precautions, the blade is still slightly out of line with the upper part, do not despair, there is still something you can do to correct it.
Lay the board on a flat surface and put a small spacer under the flat upper part so that the centerline of the actual main blade (foil) is the same distance above the table surface all the way around. If you are using say a 20 mm wood thickness, this distance will then be 10 mm. Clamp the board at the top edge with the spacer firmly in place. Now make a small 'bridge' scraper that will bridge the width of the board but where the ends will touch the table surface. The underside of that scraper should be adjustable from 22 to 24 mm above the table (or just make two). Then fill the top surface with a lightweight epoxy putty and scrap this off at 22 mm above the table top. Once cured, flip the board over and do the same procedure (leveling the blade first—now at 12 mm above the table to its centerline) and fill the other side of the top part - leveling that with the scraper now set at 24 mm parallel to the surface. Once cleaned off, your upper part should now have surfaces that are perfectly aligned with the main blade, but now 24 mm total thick.
Once sanded and wiped off, now add a 6" (150 mm) wide tape of unidirectional carbon fiber—6 to 10 oz will do it. This can stop about 100 mm from the bottom and rounded off.
Then sand and add another UNI CF tape—this time only 80‑100 mm wide and this can stop 150 mm from the bottom.
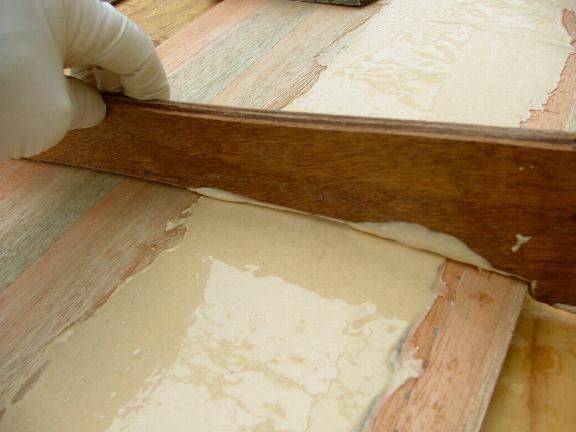
Once cured, it's a good idea to add something resistant at the nose. I suggest to either add a 6 to 8 mm fiberglass rod on the nose flat (as shown in the photo) or add a 5 oz Kevlar® tape (25–50 mm wide). In the latter case, wrap a piece of wax paper over the wet tape and add many strips of masking tape to hold it firmly to the pre-rounded and primed wood nose.  This will give extra abrasion resistance to that front edge. By cutting a few darts, you should also be able to carry this tab down under the lower edge, but always use wax paper (or some other peel-off layer) and masking tape to make sure it bonds tightly to the wood. Use tape if you're holding a FG rod in place as shown here and cut ½ way through the rod from the underside, to help it take a curve, but fill those saw-cut-slots with thickened epoxy.
Once cured, sand again and then do another fairing with filler in any areas needing it, so that the surface is almost perfect (see at right).
Then wrap the entire board with 1 or 2 layers of 6 oz fiberglass (making sure you do not exceed 28 mm in finished thickness), starting and finishing the cloth edge at the rear—and sanding between coats.
Finally sand again. Then bond in the 60 mm length of 25 mm diam hardwood at the location on the plan and then paint, sand and paint again. Other than adding the lift handle, you're all done.
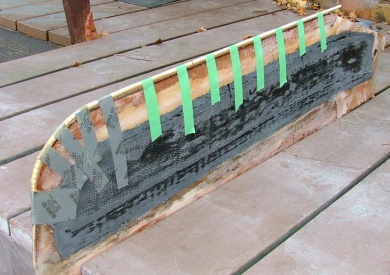
 Just a note on fairing. It's good to check with the template and to mark when it touches and where it still needs filler, say every 2 cm or every inch along the board, and then you can create a contour line for where to add filler. Here's an example of this.
Read more Construction Tips & Techniques.
"New articles, comments and references will be added periodically as new questions are answered and other info comes in relative to this subject, so you're invited to revisit and participate." —webmaster
"See the Copyright Information & Legal Disclaimer page for copyright info and use of ANY part of this text or article"